| Course Syllabus |
Visibility of Objects
The visibility of objects can be animated on and off. This would allow you to have an object "pop" into a scene or be invisible when it is out of the camera view. This helps rendering time. If you want to have an object gradually appear in a scene, then you need to keyframe its transparency.
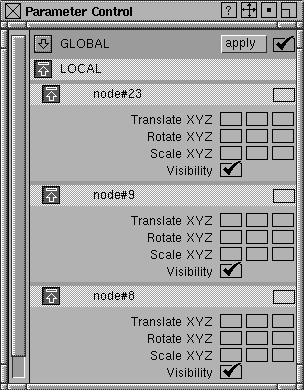
1. Make the objects you want to animate the visibility on active. Open up the Parameter Control window (Animation -> Param control ..) and turn on the the Visibility channel under each object. You probably want to turn off all the other Translate, Rotate and Scale channels to prevent from over riding settings.

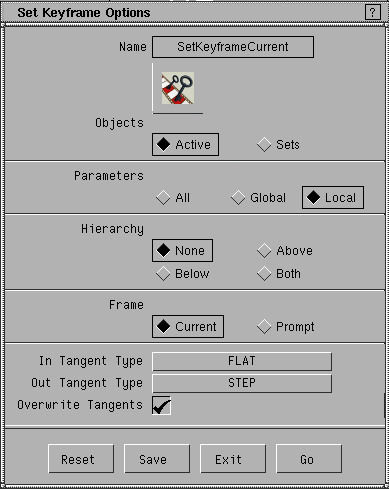
2. If you want to make an object to be visible and then disappear, then go to last frame where it will be visible (Anim -> View Frame). Open up the option box for Set Keyframe (Animation -> Set keyframe-> Option Box). Make sure the Parameter section is set to Local, set In Tangent Type to FLAT and Out Tangent Type to STEP. Click on Go to set the keyframe. You have now animated the visibility on for the object.
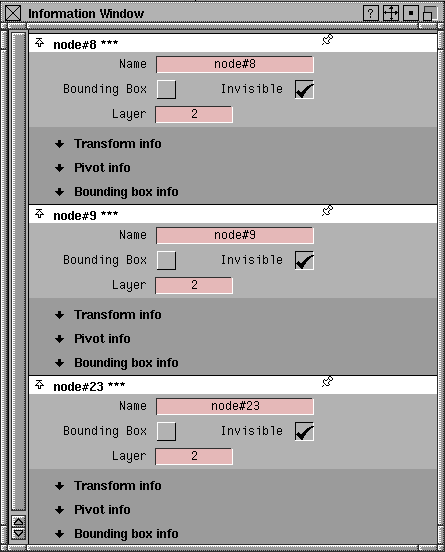
3. Go to the next frame where you want the object to become invisible. Open up the Information window (Windows -> Information -> Information window... ). Under the objects name is a check box for Invisible. Click it on for each object. Set another key frame for the objects using the same settings as before (Animation -> Set keyframe).
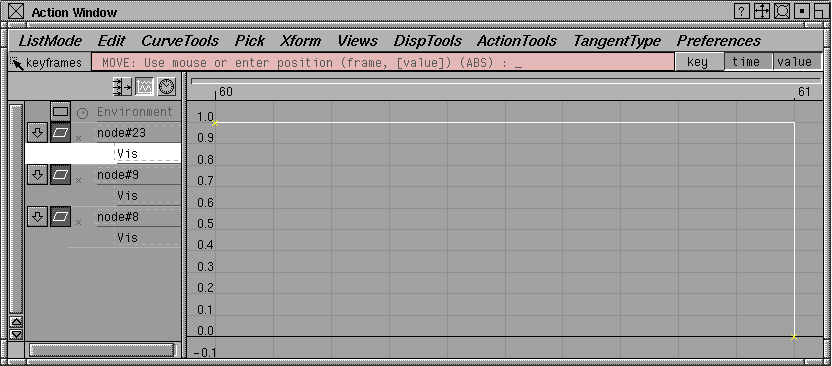
If you look in the Action window at the visibility channel for each object, the animation curve will step down from one frame to the next. This is what makes visibility a "binary function" - it is either off or on. If you want to animate an object from invisibility to being visible, simple make it invisible in Step 2 and then visible in Step 3.
Camera cuts allow you to switch between one perspective window to another during animations. Setting up the camera cuts is easy but their is one additional step that you have to take (editing the SDL file) to get everything to work together. Here is how you would do it.
1. Create the different perspective windows as normal. This can be accomplished using the Layouts -> New Camera and switching between the cameras with the Camera Switcher on the title bar of the perspective window.
2. Make sure the perspective window is active and then open the parameter control window (Animation -> Param control ...). Under the Local section, there should be a Window.Persp tab. Open it up and click on the Camera box. This will make the perspective window animatable.
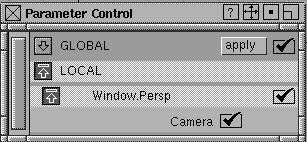
3. Go to the key frame where you want the window to change. Select the first camera with the Camera Switcher. Open up the option box for Set Keyframe (Animation -> Set keyframe-> Option Box). Make sure the Parameter section is set to Local, set In Tangent Type to FLAT and Out Tangent Type to STEP. Click on Go to set the keyframe.
Step one frame and switch the perspective windows. Set another key frame. The animation between the windows has been set. When you play back the animation, the perspective window will change between the different cameras. To get the window to switch back, move the next keyframe, switch the cameras and then set another keyframe.

4. Before saving the file as a SDL to render from, make sure all the windows that are animated have been selected in the render globals window. Open up the Globals window (Render -> Globals...) and go to the Image File Output section. Click on any camera that have been animated.
5. To render the file, you must save it out as a SDL file and them start the command line rendering.
File -> Export -> SDL
6. Before starting the rendering, the SDL file must be edited so multiply files (ie. test_camera, test_camera#2) will not be written. This will happen because of the setting done in the render globals. Open the SDL file.
File -> Edit SDL
Pick the SDL file that you created in Step 5. This opens a jot window. Search forward in the file to find the camera references.
Select -> Search Forward
Type in the "pix/". You should go to a line that has "pix/" followed by the SDL file name. When the rendering program executes, it uses this name to save files under in the pix directory. The first camera you come to should only be list the "pix/" followed by the SDL file name. Search forward again and use the same string as before. The next line should have the SDL file name followed by the "camera". Change this to simple the SDL file name. If you have more than two camera that were animated, then search forward again and change the next name as well. You have to do this for each camera.
Example:
pix/test_camera and pix/test_camera#2 should be pix/test
After changing all the camera names, save the file. You can now start a command line rendering job using either the renderer or raytracer program.
Making a Quicktime movie ... (return to top)
After making an animation sequence and rendering it out in Alias, you need to make the separate files into one Quicktime file. This allows the movie to be played on a Windows, Mac or UNIX machines and inserted into other programs like PowerPoint, Director or Flash. Making the movie is a three step process. It requires you to convert the files using FCheck, importing the converted files in Premiere and then exporting the files into a Quicktime movie.
Below is a text version of the process. Follow this link to see another version of the process which includes images.
1. Within Alias, go to Animation > FCheck. Within FCheck, open the animation by going to File > Open Animation .... Locate the animation sequence. To see the files, you probably need to change the "Files of type: Images" to "All Files". FCheck will load up the sequence. There are several keyboard commands available to play, start/stop, etc. Use Help > Manipulations ..., Animation, Mouse, & Keyboard to see the controls. Pressing the space bar will stop the animation.
Save these files out as a new animation sequence, go to File > Save Animation .... Choose TIFF as the "Save as type:" This is an uncompressed format so you will not loose any quality from compression. Very important this next step: Give the sequence a name and include in it number symbols (#) for each frame number. For example, if you saved out the file from Alias with test.001, test.002, etc, the new name would be test###.tif.
2. Open up Adobe Premiere next and important the files. When Premiere starts, it will ask for Project Settings. Basically, this is the image size, frame rate, etc. For most application, start with Multimedia Quicktime. Next, load up the new animation sequence. Go to File > Import > File. Locate the files and select the first file in the sequence. Check the Numbered Stills box at the bottom of the Import window to load theseas one sequence.
Next, drag the animation to the timeline. Look for a window called Project. You should see the animation sequence with a movie icon. Click and drag this the sequence to the Timeline window in the Video 1 channel. Postion the sequence at the start. You can preview the movie using the Monitor window. To make chnages to the project, got to Project > Project Settings > Video. Image size, Frame rate, compression all can be changed within this window.
3. Finally, save out the movie. Go to File > Export Timeline > Movie. Name the movie with a .mov extension. The current setting will be displayed below the File name. Use the Settings button to make any changes. A better compression to use is Animation.
Rendering animation sequence ... (return to top)
After setting keyframes or motion path animations, you need to render out an image for each separate frame. There is an automatic way to do this within Alias.
1. Within Alias, go to Render > Globals ...
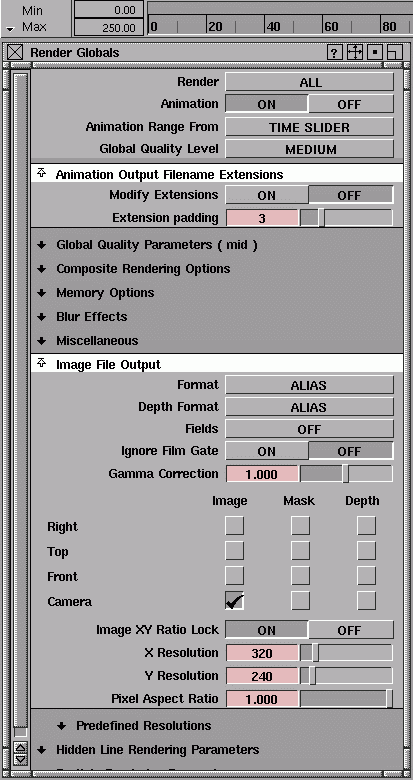
2. Click On the Animation tab. The Animation Range From option appears after the Animation option. There are three options: Time Slider, Min/Max and Global. If your Time Slider (Animation > Tgl Time Slide) is set correctly, then just leave it on this option. Otherwise, use the Min/Max option which bases the animation sequence on the total frames in the file or use the Global option and input values for the Frame Start, End and By values. The image above shows part of the Time Slider which has been set to Min/Max.
3. Next, open the Animation Output Filename Extensions tab and set the Extension padding to min of 3. This sets the extension after each file to the correct sequence of .001, .002, .003, etc.
4. Finally, open the Image File Output tab and make sure the correct camera is selected and set the X and Y Resolution. I would recommend 320 x 240 or something similar in size the keep the file size lower and help with the play back speed.
5. After making these changes, close the Global window and go to Render > Render > Option. Choose either Raycaster or Raytrace and Local or Remote Host. Select Go and give the program a filename for the animation sequence.